Vectorization of structured data in Pyramid is the process by which selected attributes from a semantic model are processed through special LLM-related engines to 'embed' vectors for each item or member in the attribute. Generally referred to as structured RAG, the vectors are stored alongside the data in the source database and can be used during the NLQ engine to find and retrieve relevant members from the database for querying and analysis. In effect, the vectorization process enables LLMs to be aware of bespoke, individual members or data elements in a customer's database.
Creating Vectors (embeddings) on data allows users to ask natural questions using granular data elements and get relevant results from AI agents (via the Chatbot) and LLMs. For example, you could create vectors for your products with related attributes like size to allow the LLM to answer questions like "Which of my large clothing items are most profitable?" The LLM itself doesn't know anything specifically about your data, but the vectors enable it to interpret the question, interact with Pyramid's (MCP) agency and find the right members from your database to be used in queries and analysis. In effect Pyramid and the LLM agent work together, combining natural language understanding, vectorized data, and accurate data retrieval to deliver intuitive answers grounded in private data.
- Click here for more details on asking granular NLQs in the Chatbot
Note: This feature requires specific licensing options
Embedding is only supported on a limited number of data technologies. As of writing, it can be applied on write-capable Pyramid In-Memory Databases (IMDB) only.
Building a Vector
Adding a New Vector
Creating Vectors
From the Master Flow page:
- From the AI options in the Master Flow Nodes panel, drag-and-drop Vectors onto the canvas:
- Connect the Data Model node to the new Vector node:
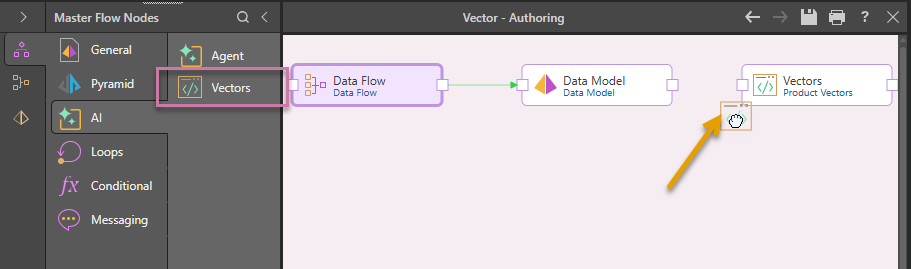
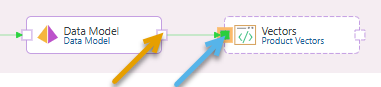
The connection is created by selecting the "end connector" (orange arrow) on the source node and then dragging your cursor to the "start connector" (blue arrow) on the target node. Once you select the target and release your mouse button, the connecting arrow is drawn.
Configuring Vectors
To set up the details of your Vectors:
- Open the Vectors page using one of the following methods:
- Double-click the Vector node on the canvas.
- Click the Vector tab (orange arrow below) from the Modeling options to the left of the canvas.
- From the Select Attribute panel, find the hierarchy that you want to add to your Vector and drag it onto the Main Attribute drop zone.
- Optionally, add related attributes through one of the following steps:
- Drag other attributes and drop them onto the Related Attributes Selection drop zone.
- Click Suggest Attributes to automatically generate a set of Related Attributes.
- Click Apply.
When you select a Main Attribute, you are indicating that your Chatbot searches can use embedding to search the names associated with this attribute. For example, adding the Product hierarchy allows searching for "Sales for products with name Cal."
When you select Related Attributes, you are indicating that your Chatbot searches can use embedding to search these other attributes with reference to the main attribute. For example, adding the Size hierarchy allows searching for "Sales for large products."
The vector is created and the Existing Vectors panel is updated with your changes.
What next?
To put your vectors into use, you need to process the model by clicking the Run button (top-left) or pressing F2 on your keyboard. For more information, see Model Processing.
Vector Designer
Open the Vector page by double-clicking a Vector node in your Master Flow or by clicking the Vector tab (orange arrow below) in the Modeling options:
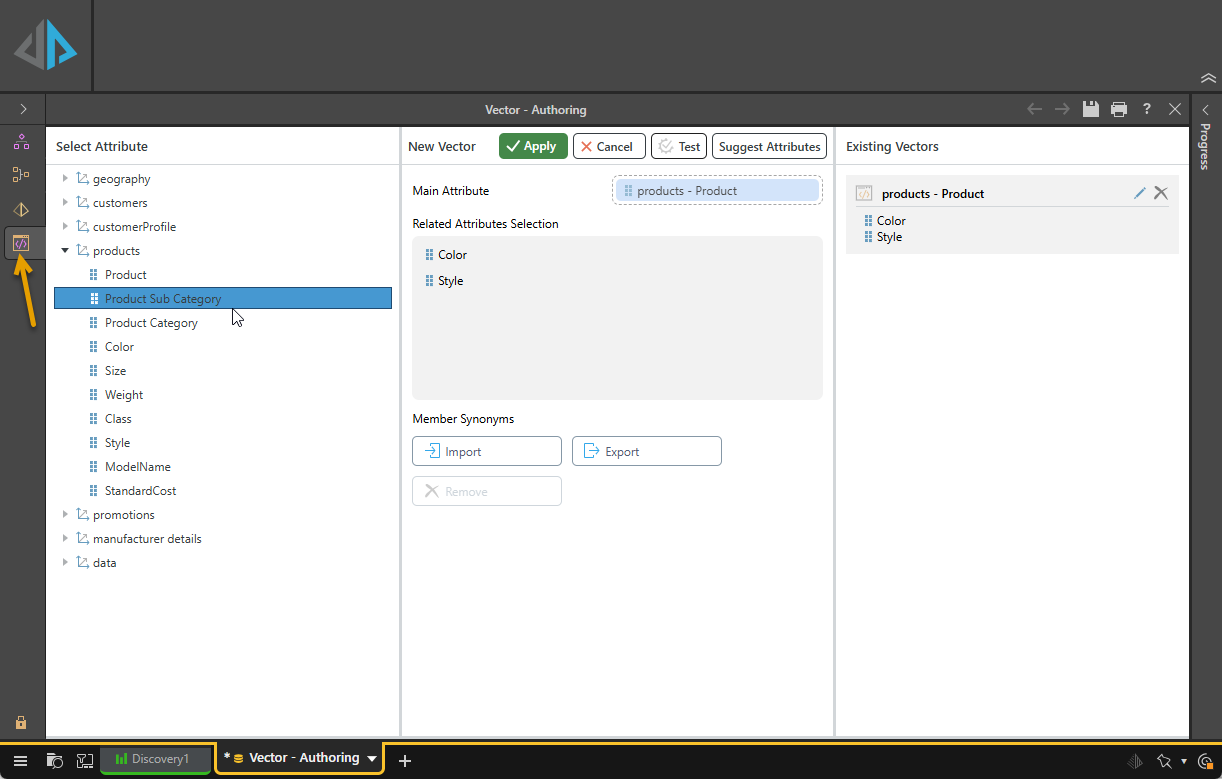
Select Attribute
The Select Attribute column, to the left of the view, lists the Dimensions and their hierarchies for selection. You can drag and drop these attributes onto the Main Attribute and Related Attributes Selections drop zones to define the details of your Vector.
New Vector
The New Vector column, in the center of the page, is where you create your Vector by dragging attributes onto the two following drop zones:
- Main Attribute: When you select a Main Attribute, you are indicating that your Chatbot searches can use embedding to search the names associated with this attribute. For example, adding the Product hierarchy allows searching for "Sales for products with name Cal."
- Related Attributes Selection: When you select Related Attributes, you are indicating that your Chatbot searches can use embedding to search these other attributes with reference to the main attribute. For example, adding the Size hierarchy allows searching for "Sales for large products."
Important: Related attributes do not have to be from the same dimension as the main attribute, but they do need to be upstream from it. There also needs to be a one-to-one relationship between an instance of the main attribute and each related attribute (one product can only have one size, for example).
Command Buttons
Use the buttons above the drag-and-drop area to complete the task:
- Apply: Save the vector you have created or modified and update the Existing Vectors panel with your changes.
- Cancel: Edit only. Discard any unsaved changes.
- Test: Check the structure of the main and related attributes and return a response to indicate success or otherwise.
- Suggest Attributes: Automatically generate a set of Related Attributes, based on the attributes you have already added. The additional attributes are added to the Related Attributes selection panel.
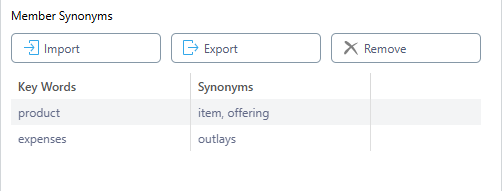
Member Synonyms for vectorized columns
Synonyms are alternative names for the items in your columns. Column synonyms are created by importing a list of keywords and their synonyms as a JSON file, which allows the AI to understand which alternative terms refer to attribute members, in when queries are run against this model.
Import
Import a list of keywords and their synonyms as a JSON file.
Tip: When you import a new JSON, the existing synonym library is replaced in full. You should, therefore, consider exporting the existing library and then adding your new values to it. This ensures that you do not accidentally lose any values.
The imported JSON file should be written in the following format:
[ { "keyword": "product", "synonyms": "item, offering" }, { "keyword": "expenses", "synonyms": "outlays" } ]
- The basic format is:
[{"keyword":"","synonyms":""}]. - Where there are multiple synonyms for one keyword, the value should be a single string that uses commas to separate each value. For example,
"synonyms":"value1, value2, value3". - Your values cannot contain wildcards.
Once uploaded, your synonym library appears as follows:
Export
Export your current synonym library as a JSON file.
Note: If you click Export but your synonym library does not contain any values, a JSON file containing the following is exported: keywords.
Remove
Delete your synonym library.
Existing Vectors
The Existing Vectors column, to the right of the page, contains the vectors that have already been defined. Note that the Main attribute provides the name of each vector and the Related Attributes are described beneath it. The options, from left to right, are:
- To edit an existing Vector, click Edit. This opens the Vector that you are editing in the New Vector column, where you can edit its details and then Apply your changes.
- To delete the Vector, click the X.